Raspberry Pi 101 UNAL

Table of Contents
This is a practical introductory course created for the Digital Technology course at the Universidad Nacional de Colombia, highlighting the potential of Single Board Computers (SBC) such as the Raspberry Pi, where the true power of these devices is achieved through the coding process, which unlocks their full capabilities.
Course Staff #
- Professor: Francisco Meluk Orozco
- Engineer: Ricardo Perdomo González
- Student: Daniel Felipe Montenegro
Location #
- Building 411-103, Microprocessors Laboratory
Step-by-Step Learning Plan #
Part 1: Foundations and Core Concepts #
- Introduction and Theoretical Concepts
- The Origins of Raspberry Pi
- Model Comparison
- Technical Specifications (Hardware & Software)
- Real-World Applications and Interesting Projects
- Remote Access and File Management
- Headless SSH Connection
- Transferring Files and Syncing Directories
- GPIO Basics and Digital I/O
- BCM vs BOARD: Pin Numbering in Raspberry Pi
- Setting Up GPIO for Output
- Setting Up GPIO for Input
- Essential GPIO Scripting: The Importance of
.cleanup()
Remote Access and File Management #
Headless SSH Connection #
In a headless setup, your Raspberry Pi runs without a monitor, keyboard, or mouse. Instead, you access it remotely using SSH (Secure Shell), a protocol that provides an encrypted channel for secure communication between computers. This method is ideal for remote management and is considered best practice.
Windows and macOS: #
Replace user with your actual username and hostname.local with the Raspberry Pi’s hostname.
To exit the SSH session, simply type: exit or press Ctrl + D
Transferring Files and Syncing Directories #
This step is optional but is provided in the workshop to simplify sending your code to the Raspberry Pi. A common tool for this task is rsync, which efficiently synchronizes files and directories between your computer and the remote device.
macOS and Windows (via Git Bash or Windows Subsystem for Linux): #
rsync -avz --delete ./ [email protected]:/home/user/folder/
IMPORTANT:
- On macOS,
rsyncis installed by default. - On Windows, if
rsyncis not available, you can install it using Git for Windows (which provides Git Bash) or enable the Windows Subsystem for Linux (WSL).
If you prefer not to use rsync, you can also manage files directly on the Raspberry Pi with terminal-based editors or viewers.
GPIO Basics and Digital I/O #
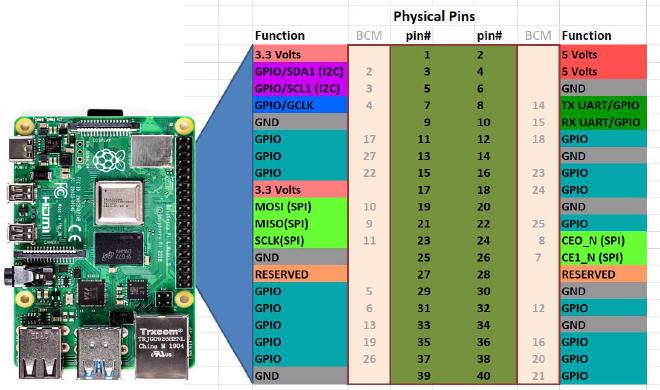
BCM vs BOARD: Pin Numbering in Raspberry Pi #

Raspberry Pi offers two numbering systems for its GPIO pins:
- BCM (Broadcom SOC Channel): This method refers to the pin numbers based on the Broadcom chip. It is considered best practice and is typically the numbering printed on Raspberry Pi cases and accessories.
- BOARD: This method uses the physical pin layout on the Raspberry Pi header.
For consistency and compatibility with most accessories, it’s recommended to use the BCM numbering system.
Setting Up GPIO for Output #
When controlling devices like LEDs, you configure a GPIO pin as an output. Instead of hardcoding a specific pin number, define a variable for flexibility.
Example:
import RPi.GPIO as GPIO
import time

# Use BCM numbering mode (best practice)
GPIO.setmode(GPIO.BCM)

# Define the GPIO pin for the LED (replace with your desired pin number)
LED_PIN = 12

# Configure the pin for output
GPIO.setup(LED_PIN, GPIO.OUT)

# Toggle the LED on and off
GPIO.output(LED_PIN, GPIO.HIGH)
time.sleep(1)
GPIO.output(LED_PIN, GPIO.LOW)
time.sleep(1)
Setting Up GPIO for Input #
Configuring a GPIO pin as an input lets you read signals like button presses. You can also set up internal pull-up or pull-down resistors.
Example:
import RPi.GPIO as GPIO

# Use BCM numbering mode (best practice)
GPIO.setmode(GPIO.BCM)

# Define the GPIO pin for the button (replace with your desired pin number)
BUTTON_PIN = 21

# Configure the pin as input with an internal pull-up resistor
GPIO.setup(BUTTON_PIN, GPIO.IN, pull_up_down=GPIO.PUD_UP)

# Check the button state
if GPIO.input(BUTTON_PIN) == GPIO.LOW:
    print("Button Pressed!")
else:
    print("Button Released!")
Essential GPIO Scripting: The Importance of .cleanup() #
To ensure that the GPIO pins are reset to a safe state after your script runs, always call GPIO.cleanup(). Using a try finally block guarantees that GPIO.cleanup() executes even if an error occurs during your script.
import RPi.GPIO as GPIO
import time

# Use BCM numbering mode (best practice)
GPIO.setmode(GPIO.BCM)

# Define GPIO pins using variables
LED_PIN = 12       # Replace with your chosen output pin number
BUTTON_PIN = 21    # Replace with your chosen input pin number

try:
    # Setup for output and input
    GPIO.setup(LED_PIN, GPIO.OUT)
    GPIO.setup(BUTTON_PIN, GPIO.IN, pull_up_down=GPIO.PUD_UP)

    # Example: Toggle the LED
    GPIO.output(LED_PIN, GPIO.HIGH)
    time.sleep(1)
    GPIO.output(LED_PIN, GPIO.LOW)

    # Example: Check the state of the button
    if GPIO.input(BUTTON_PIN) == GPIO.LOW:
        print("Button Pressed!")
    else:
        print("Button Released!")

finally:
    # Ensure that GPIO.cleanup() is always called,
    # resetting the GPIO pins to their default state.
    GPIO.cleanup()
Using a try finally block is a good practice to ensure that no matter what happens in your code, the GPIO pins are always cleaned up properly.
Prisoner’s Dilemma #
Perhaps this is the most famous problem in game theory, which is fundamentally based on cooperation and where two subjects face the same dilemma of whether to cooperate or not, with the only certainty being that their subsequent reward or outcome will be closely related to the decision made by the other. This problem has different versions; however, for this project, we will use the Symmetric 2×2 PD With Ordinal Payoffs (explained in greater depth in the Stanford Encyclopedia of Philosophy) as exemplified in the table below:
| cooperate | defect | |
|---|---|---|
| cooperate | B, B | D, A |
| defect | A, D | C, C |
Always satisfying: A>B>C>D. For this project, the equivalences used were as follows: A=5, B=3, C=1, D=0. The resulting table is shown below:
| cooperate | defect | |
|---|---|---|
| cooperate | 3, 3 | 0, 5 |
| defect | 5, 0 | 1, 1 |
“What Game Theory Reveals About Life, The Universe, and Everything” by Veritasium #
If you’re interested in learning more, I recommend watching the video titled “What Game Theory Reveals About Life, The Universe, and Everything” by Veritasium, as well as the educational game created by Nicky Case, “The Evolution of Trust”.
Coursework: Assignments & Quizzes #
Quiz #1: LED Resistor Calculation #
Calculate the appropriate resistor value for a red LED connected to a Raspberry Pi GPIO pin.
Ohm’s Law:
$$
R = \frac{V_{source} - V_{LED}}{I}
$$
Use the following values:
- Red LED Voltage Drop:
$$ V_{LED} = 1.8V + \left(\frac{n}{k} \times 0.3V\right) $$ - Current:
$$ I = 9mA + \left(\frac{n}{k} \times 0.3mA\right) $$
Where \( n \) is the assigned group number and \( k \) is the total number of groups.
Quiz #2: Finding the Raspberry Pi’s Local IP #
Use SSH to find the local IP address of the Raspberry Pi and take a screenshot as proof.
Provide screenshots of the following steps:
- The SSH command used to connect.
- The
ifconfigcommand output. - The
hostname -Icommand output.
Assignment #1: Prisoner’s Dilemma Simulation #
Develop a script that simulates the Prisoner’s Dilemma using two RGB LEDs and two push buttons—one for cooperation and one for defection.
The number of rounds is left to your discretion. However, a fixed number of rounds allows for potential exploits, which should be avoided. The system must support multiple rounds, but its duration should remain practical, as it will be reviewed in class. Excessively long runs would be impractical, so all design choices should prioritize efficiency and feasibility.
Note: There is complete freedom in software design and pin selection. The goal is to design and experiment to create the best possible Prisoner’s Dilemma simulation using only two RGB LEDs and two push buttons.
Assignment #2: Raspberry Pi Prisoner’s Dilemma Tournament #
Clone the raspberrypi-prisoners-dilemma repository, review client.py, and modify the decide_move() function to develop your own game strategy. Then, participate in the tournament to determine the winning team in the course.